Installing Kali on Mac Hardware
Table of Contents
IMPORTANT! Newer Mac hardware (e.g. T2/M1 chips) do not run Linux well, or at all. This is true for Linux in general, not just Kali Linux.
The model & year of the device will determine how successful your experience will be.
Installing Kali Linux (Single boot) on Apple Mac hardware (such as MacBook/MacBook Pro/MacBook Airs/iMacs/iMacs Pros/Mac Pro/Mac Minis), can be a straight forward, if the hardware is supported. Most of the time, there are a few issues that come up, so there is a bit of trial and error.
This guide will show you how to replace macOS/OS X with Kali Linux. However, if you wish to keep macOS/OS X, you will want to refer to our dual-boot guide instead.
In our example, we will be installing Kali Linux on a Mac Mini (Mid 2011) using macOS High Sierra (10.13). The same procedure has also been tested on a Mac Book Air (Early 2014) using macOS Catalina (10.15).
Installation Prerequisites
This guide will make the following assumptions:
- You have read our single boot Kali Linux install guide, as this has the same Installation Prerequisites (System requirements, setup assumptions and install media).
- Currently running macOS/OS X 10.7 or higher (later versions are more preferred) as this means the hardware is Intel (and not a PowerPC CPU).
- Depending on the Mac hardware model & year, you may find:
- Different results when trying to boot by using either a CD/DVD or a USB drive.
- You may be able to increase the chances of booting (especially older hardware and non-EFI) from a USB drive by having rEFInd pre-installed.
- When using the graphical installer, you may notice the tracepad does not function (but will after Kali Linux is installed).
- In-built wireless may not work, as
firmware-b43-installeris not included in the default images.
- Different results when trying to boot by using either a CD/DVD or a USB drive.
We will be wiping any existing data on the hard disk, so please backup any important information on the device to an external media.
Kali Linux Installation Procedure
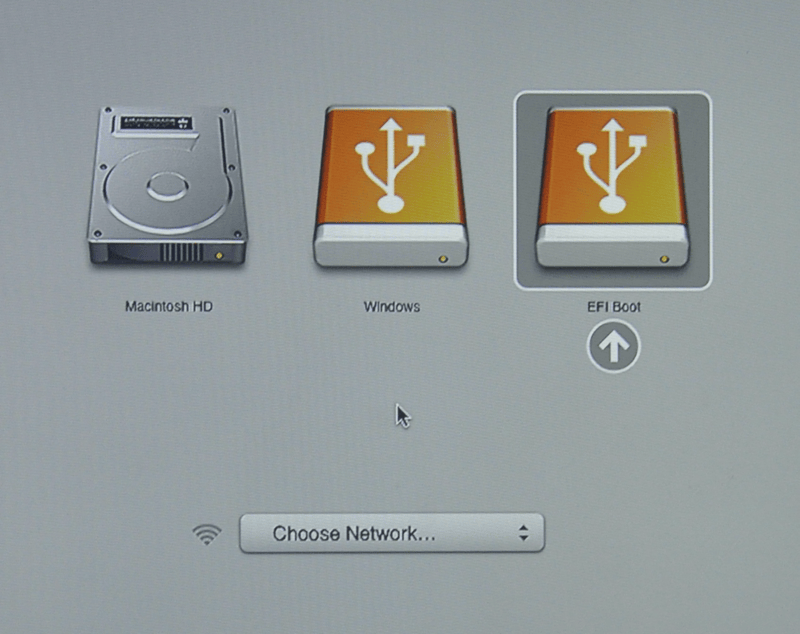
- To start your installation, make sure you insert your Kali Linux installation medium and power on the device. Immediately press and hold the Option (or Alt) ⌥ key until you see the boot menu (rEFInd if installed, else the default macOS/OS X). You may or may not have a Recovery HD depending on your macOS/OS X setup.
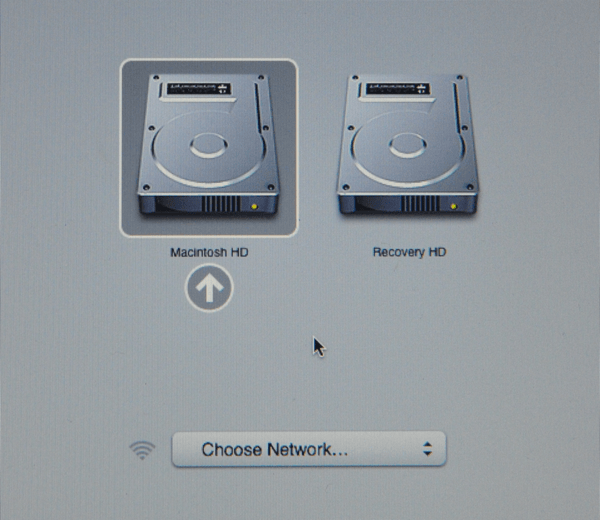
- When the boot menu appears, if everything works as expected, you should see two volumes:
- EFI Boot - Newer hardware which support UEFI. It is common for GUID Partition Table (GPT) partitions to be used.
- Windows - “Non-EFI” boot. This use on older hardware which uses BIOS. You often see Master Boot Record (MBR) partition tables here.
If you only see one volume (EFI Boot), then the installation media is not supported for this device. This could be because the age of the firmware on the device.
You may wish to install rEFInd, as it is a boot manager, and try again.
Even though Kali Linux is based on Debian, macOS/OS X always detects non-EFI boot media as Windows. We suggest that you select the EFI Boot volume to continue. However, if the installation hangs at this point, power cycle and select Windows (Being Kali Linux non-EFI/BIOS). The success depends on the Mac hardware’s model & year.
Kali Linux Installation Procedure
The installation procedure from this point onwards is the same as our Kali Linux Hard Disk install guide.
After that is complete, all that is left is to reboot, take out the installation media, and enjoy Kali Linux.
Troubleshooting macOS/OS X
If you have issues installing Kali Linux on macOS/OS X, there are a few options you can try:
- Install the latest version of macOS/OS X (App store, Recovery or USB) and applying any updates as this may upgrade the firmware.
- Install rEFInd boot manager to replace the default boot manager.
- If you’re using a DVD, refresh rEFInd once the drive has stop spinning by pressing
ESC. - Switch from EFI to BIOS boot when trying to boot Kali Linux.
- Switch from GPT drive to Hybrid MRB drive (using the Live image may help).
Post Installation
Now that you’ve completed installing Kali Linux, it’s time to customize your system.
The General Use section has more information and you can also find tips on how to get the most out of Kali Linux in our User Forums.
Updated on: 2025-Jul-21
Author:
g0tmi1k