Making a Kali Bootable USB Drive (Linux)
Table of Contents
Our favourite way, and the fastest method, for getting up and running with Kali Linux is to run it “live” from a USB drive. This method has several advantages:
- It’s non-destructive - it makes no changes to the host system’s hard drive or installed OS, and to go back to normal operations, you simply remove the “Kali Live” USB drive and restart the system.
- It’s portable - you can carry Kali Linux in your pocket and have it running in minutes on an available system
- It’s customizable - you can roll your own custom Kali Linux ISO image and put it onto a USB drive using the same procedures
- It’s potentially persistent - with a bit of extra effort, you can configure your Kali Linux “live” USB drive to have persistent storage, so the data you collect is saved across reboots
In order to do this, we first need to create a bootable USB drive which has been set up from an ISO image of Kali Linux.
What You’ll Need
- A verified copy of the appropriate ISO image of the latest Kali build image for the system you’ll be running it on.
- See the details on downloading official Kali Linux images.
- As you’re running under Linux, you can use the
ddcommand, which is often pre-installed, or use Etcher. - A USB thumb drive, 4GB or larger.
- Systems with a direct SD card slot can use an SD card with similar capacity. The procedure is identical.
Kali Linux Live USB Install Procedure
The specifics of this procedure will vary depending on whether you’re doing it on a Windows, Linux, or macOS/OS X system.
Creating a Bootable Kali USB Drive on Linux (DD)
Creating a bootable Kali Linux USB drive in a Linux environment is straightforward.
Once you’ve downloaded and verified your Kali ISO files, you can use the dd command to copy it over to your USB drive using the following procedure.
Note that you’ll need to be running as root, or to execute the dd command with sudo. The following example assumes a Linux Mint host - depending on the distro you’re using, a few specifics may vary slightly, but the general idea should be very similar. If you would prefer to use Etcher, then follow the same directions as a Windows user. Note that the USB drive will have a path similar to /dev/sdb.
WARNING: You can easily overwrite a disk drive you didn’t intend to with dd if you do not understand what you are doing, or if you specify an incorrect output path. Double-check what you’re doing before you do it, it’ll be too late afterwards.
Consider yourself warned.
- First, you’ll need to identify the device path to use to write the image to your USB drive. Without the USB drive inserted into a port, execute the command
sudo fdisk -lat a command prompt in a terminal window (if you don’t use elevated privileges with fdisk, you won’t get any output). You’ll get output that will look something (not exactly) like this, showing drives - “/dev/sdX” - containing their partitions - /dev/sdX[1-9]. Here we just have a single drive /dev/sda, with three partitions:
user@mint:~$ sudo fdisk -l
Disk /dev/sda: 2.73 TiB, 3000592982016 bytes, 5860533168 sectors
Disk model: WDC WD30EZRX-00D
Units: sectors of 1 * 512 = 512 bytes
Sector size (logical/physical): 512 bytes / 4096 bytes
I/O size (minimum/optimal): 4096 bytes / 4096 bytes
Disklabel type: gpt
Disk identifier: 58D184D9-8780-4B6A-80F7-E1500B95A2AB

Device          Start        End    Sectors  Size Type
/dev/sda1        2048    1050623    1048576  512M EFI System
/dev/sda2     1050624 5858531327 5857480704  2.7T Linux filesystem
/dev/sda3  5858531328 5860532223    2000896  977M Linux swap
user@mint:~$
- Plug your USB drive into your system, and run the same command, “
sudo fdisk -l” a second time. The output will look something (again, not exactly) like this, showing an additional device which wasn’t there previously. Your USB drive’s path will most likely be the last one. In any case, it will be one which wasn’t present before. For our example, you can see that there is now a /dev/sdb which wasn’t previously present, a 64GB USB drive:
user@mint:~$ sudo fdisk -l
Disk /dev/sda: 2.73 TiB, 3000592982016 bytes, 5860533168 sectors
Disk model: WDC WD30EZRX-00D
Units: sectors of 1 * 512 = 512 bytes
Sector size (logical/physical): 512 bytes / 4096 bytes
I/O size (minimum/optimal): 4096 bytes / 4096 bytes
Disklabel type: gpt
Disk identifier: 58D184D9-8780-4B6A-80F7-E1500B95A2AB

Device          Start        End    Sectors  Size Type
/dev/sda1        2048    1050623    1048576  512M EFI System
/dev/sda2     1050624 5858531327 5857480704  2.7T Linux filesystem
/dev/sda3  5858531328 5860532223    2000896  977M Linux swap


Disk /dev/sdb: 58.44 GiB, 62746787840 bytes, 122552320 sectors
Disk model: Extreme
Units: sectors of 1 * 512 = 512 bytes
Sector size (logical/physical): 512 bytes / 512 bytes
I/O size (minimum/optimal): 512 bytes / 512 bytes
Disklabel type: gpt
Disk identifier: 1D24569E-BDCD-4912-9689-8BFC38EFB130

Device      Start       End   Sectors  Size Type
/dev/sdb1      40    409639    409600  200M EFI System
/dev/sdb2  411648 122550271 122138624 58.2G Microsoft basic data
user@mint:~$
- Proceed to (carefully!) image the Kali ISO file on the USB device. We will be assuming that the ISO image you’re writing is named “kali-linux-2026.2-live-amd64.iso” and is in your current working directory.
user@mint:~$ file kali-linux-2026.2-live-amd64.iso
kali-linux-2026.2-live-amd64.iso: ISO 9660 CD-ROM filesystem data (DOS/MBR boot sector) 'Kali Linux amd64' (bootable)
user@mint:~$
DD’s blocksize parameter can be increased, and while it may speed up the operation of the dd command, it can occasionally produce unbootable USB drives, depending on your system and a lot of different factors. The recommended value, “bs=4M”, is conservative and reliable.
Additionally, the parameter “conv=fsync” makes sure that the data is physically written to the USB drives before the commands returns.
While ‘/dev/sdX’ is used in the command, the ‘/dev/sdX’ should be replaced with the drive discovered previously.
Please use the correct device name from the previous step.
Depending on your system’s age, the version of DD may be able to offer status updates/feedback (2017 on-wards):
To do this, we simply add the status flag:
user@mint:~$ sudo dd if=kali-linux-2026.2-live-amd64.iso of=/dev/sdX conv=fsync bs=4M status=progress
Otherwise, for older systems:
user@mint:~$ sudo dd if=kali-linux-2026.2-live-amd64.iso of=/dev/sdX conv=fsync bs=4M
Imaging the USB drive can take a good amount of time, over ten minutes is not unusual, as the sample output below shows. Be patient!
This use of the dd command will not provided any feedback until it’s completed, but if your drive has an access indicator, you’ll probably see it flickering from time to time. The time to dd the image across will depend on the speed of the system used, USB drive itself, and USB port it’s inserted into. Once dd has finished imaging the drive, it will output something that looks like this:
893+1 records in
893+1 records out
3748147200 bytes (3.7 GB, 3.5 GiB) copied, 998.442 s, 3.8 MB/s
That’s it, really!
Creating a Bootable Kali USB Drive on Linux (Etcher)
If you would like a graphical option to flash, we recommend Etcher
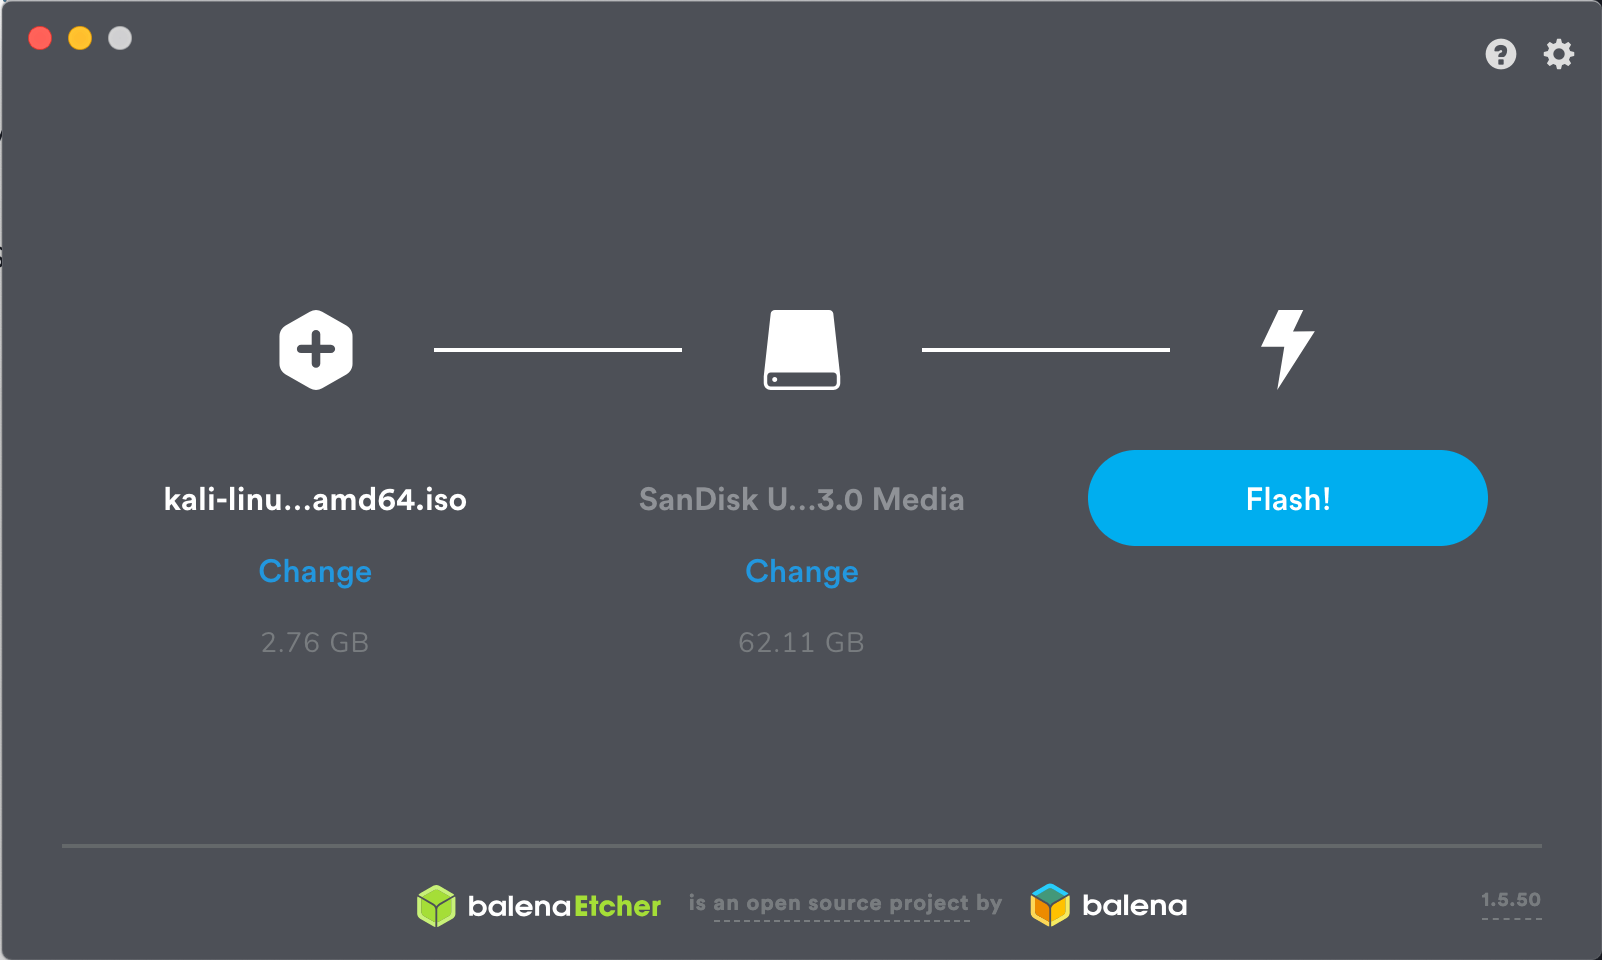
- Download and run Etcher.
- Choose the Kali Linux ISO file to be imaged with “select image” and verify that the USB drive to be overwritten is the correct one. Click the “Flash!” button once ready.
- Once Etcher alerts you that the image has been flashed, you can safely remove the USB drive.

You can now boot into a Kali Live / Installer environment using the USB device.
Updated on: 2026-Jun-30
Author:
g0tmi1k