Configuring and Tuning OpenVAS in Kali Linux
Table of Contents
Users often request the addition of vulnerability scanners to Kali, most notably the ones that begin with “N”, but due to licensing constraints, we do not include them in the distribution. Fortunately, Kali includes the very capable OpenVAS, which is free and Open-source. Although we briefly covered OpenVAS in the past, we decided to devote a more thorough post to its setup and how to use it more effectively.
Vulnerability scanners often have a poor reputation, primarily because their role and purpose is misunderstood. Vulnerability scanners scan for vulnerabilities–they are not magical exploit machines and should be one of many sources of information used in an assessment. Blindly running a vulnerability scanner against a target will almost certainly end in disappointment and woe, with dozens (or even hundreds) of low-level or uninformative results.
System Requirements
The main complaint we receive about OpenVAS (or any other vulnerability scanner) can be summarized as “it’s too slow and crashes and doesn’t work and it’s bad, and you should feel bad”. In nearly every case, slowness and/or crashes are due to insufficient system resources. OpenVAS has tens of thousands of signatures and if you do not give your system enough resources, particularly RAM, you will find yourself in a world of misery. Some commercial vulnerability scanners require a minimum of 8GB of RAM and recommend even more.
OpenVAS does not require anywhere near that amount of memory but the more you can provide it, the smoother your scanning system will run. For this post, our Kali virtual machine has 3 CPUs and 3GB of RAM, which is generally sufficient to scan small numbers of hosts at once.
Initial OpenVAS Setup in Kali
OpenVAS has many moving parts and setting it up manually can sometimes be a challenge. Fortunately, Kali contains an easy-to-use utility called ‘openvas-setup’ that takes care of setting up OpenVAS, downloading the signatures, and creating a password for the admin user.
This initial setup can take quite a long while, even with a fast Internet connection so just sit back and let it do its thing. At the end of the setup, the automatically-generated password for the admin user will be displayed. Be sure to save this password somewhere safe:
root@kali:~# openvas-setup
ERROR: Directory for keys (/var/lib/openvas/private/CA) not found!
ERROR: Directory for certificates (/var/lib/openvas/CA) not found!
ERROR: CA key not found in /var/lib/openvas/private/CA/cakey.pem
ERROR: CA certificate not found in /var/lib/openvas/CA/cacert.pem
ERROR: CA certificate failed verification, see /tmp/tmp.7G2IQWtqwj/openvas-manage-certs.log for details. Aborting.

ERROR: Your OpenVAS certificate infrastructure did NOT pass validation.
See messages above for details.
Generated private key in /tmp/tmp.PerU5lG2tl/cakey.pem.
Generated self signed certificate in /tmp/tmp.PerU5lG2tl/cacert.pem.
...
/usr/sbin/openvasmd

User created with password 'xxxxxxx-xxxx-xxxx-xxxx-xxxxxxxxxx'.
Dealing with Setup Errors
Occasionally, the ‘openvas-setup’ script will display errors at the end of the NVT download similar to the following:
(openvassd:2272): lib kb_redis-CRITICAL **: get_redis_ctx: redis connection error: No such file or directory

(openvassd:2272): lib kb_redis-CRITICAL **: redis_new: cannot access redis at '/var/run/redis/redis.sock'

(openvassd:2272): lib kb_redis-CRITICAL **: get_redis_ctx: redis connection error: No such file or directory
openvassd: no process found
If you are unfortunate enough to encounter this issue, you can run ‘openvas-check-setup’ to see what component is causing issues. In this particular instance, we receive the following from the script:
...
ERROR: The number of NVTs in the OpenVAS Manager database is too low.
FIX: Make sure OpenVAS Scanner is running with an up-to-date NVT collection and run 'openvasmd --rebuild'.
...
The ‘openvas-check-setup’ scipt detects the issue and even provides the command to run to (hopefully) resolve the issue. After rebuilding the NVT collection as recommended, all checks are passed:
root@kali:~# openvasmd --rebuild
root@kali:~# openvas-check-setup
openvas-check-setup 2.3.7
Test completeness and readiness of OpenVAS-9
...
It seems like your OpenVAS-9 installation is OK.
...
Managing OpenVAS Users
If you need (or want) to create additional OpenVAS users, run ‘openvasmd’ with the --create-user option, which will add a new user and display the randomly-generated password:
root@kali:~# openvasmd --create-user=dookie
User created with password 'yyyyyyyy-yyyy-yyyy-yyyy-yyyyyyyyyy'.
root@kali:~# openvasmd --get-users
admin
dookie
If you’re anything like us, you will forget to save the admin password or accidentally delete it. Fortunately, changing OpenVAS user passwords is easily accomplished with ‘openvasmd’ and the --new-password option:
root@kali:~# openvasmd --user=dookie --new-password=s3cr3t
root@kali:~# openvasmd --user=admin --new-password=sup3rs3cr3t
Starting and Stopping OpenVAS
Network services are disabled by default in Kali Linux so if you haven’t configured OpenVAS to start at boot, you can start the required services by running ‘openvas-start’:
root@kali:~# openvas-start
Starting OpenVas Services
When the services finish initializing, you should find TCP ports 9390 and 9392 listening on your loopback interface:
root@kali:~# ss -ant
State Recv-Q Send-Q Local Address:Port Peer Address:Port
LISTEN 0 128 127.0.0.1:9390 *:*
LISTEN 0 128 127.0.0.1:9392 *:*
Due to the strain on system resources, you will likely want to stop OpenVAS whenever you are done using it, especially if you are not using a dedicated system for vulnerability scanning. OpenVAS can be stopped by running ‘openvas-stop’:
root@kali:~# openvas-stop
Stopping OpenVas Services
Using the Greenbone Security Assistant
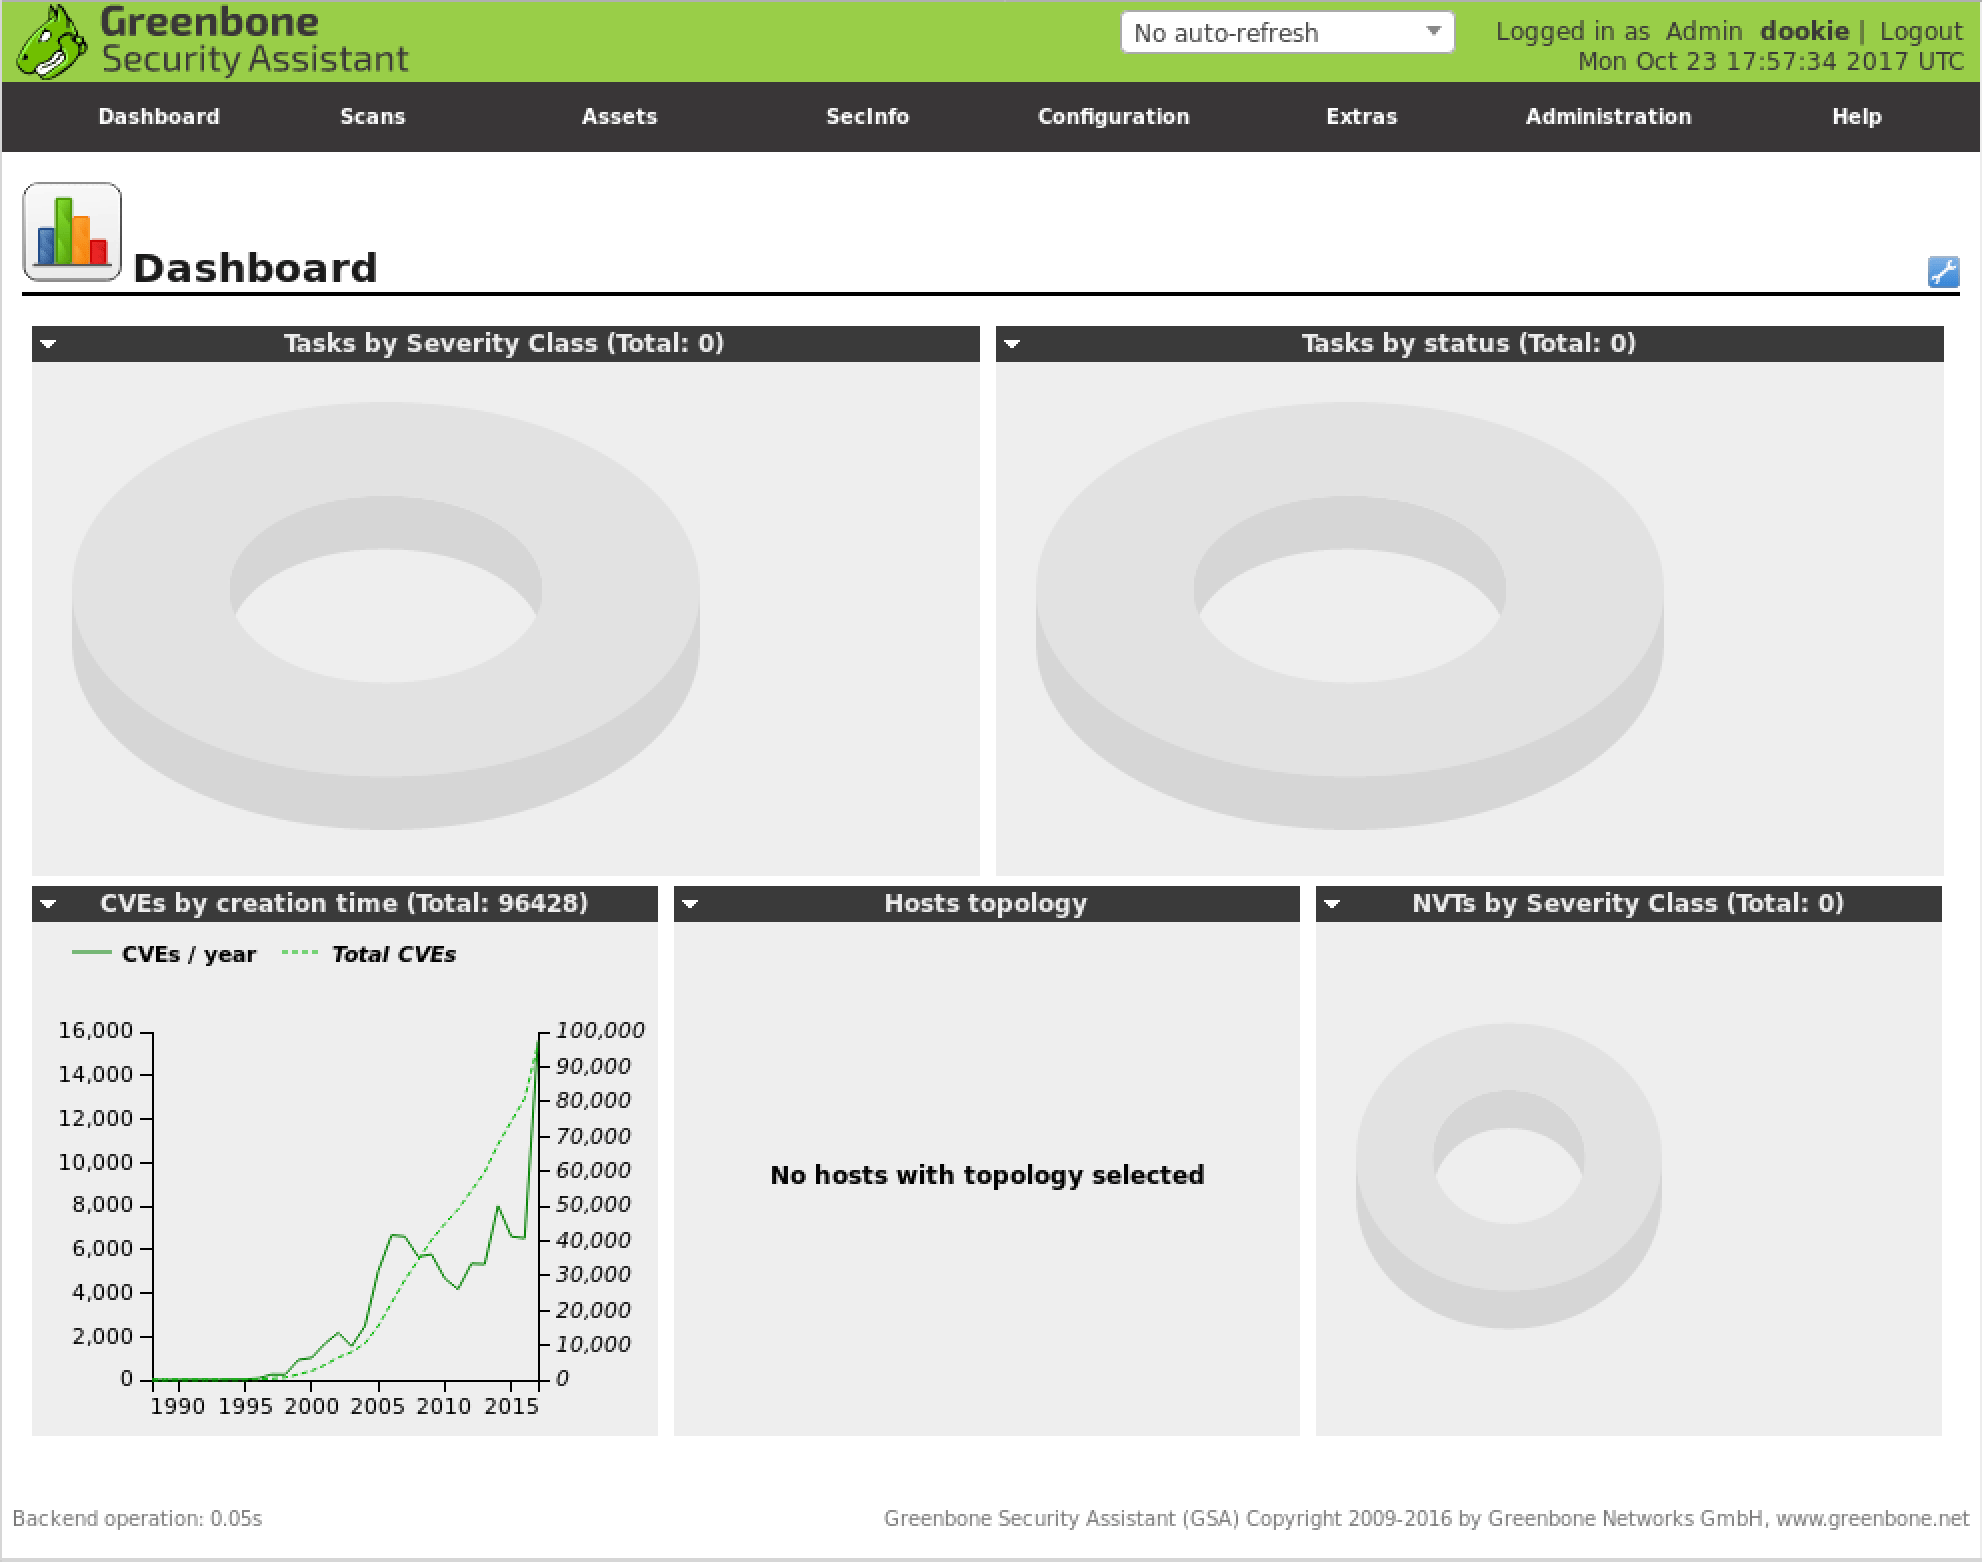
The Greenbone Security Assistant is the OpenVAS web interface, available on your local machine (after starting OpenVAS) at https://localhost:9392. After accepting the self-signed certificate, you will be presented with the login page and once authenticated, you will see the main dashboard.
Configuring Credentials
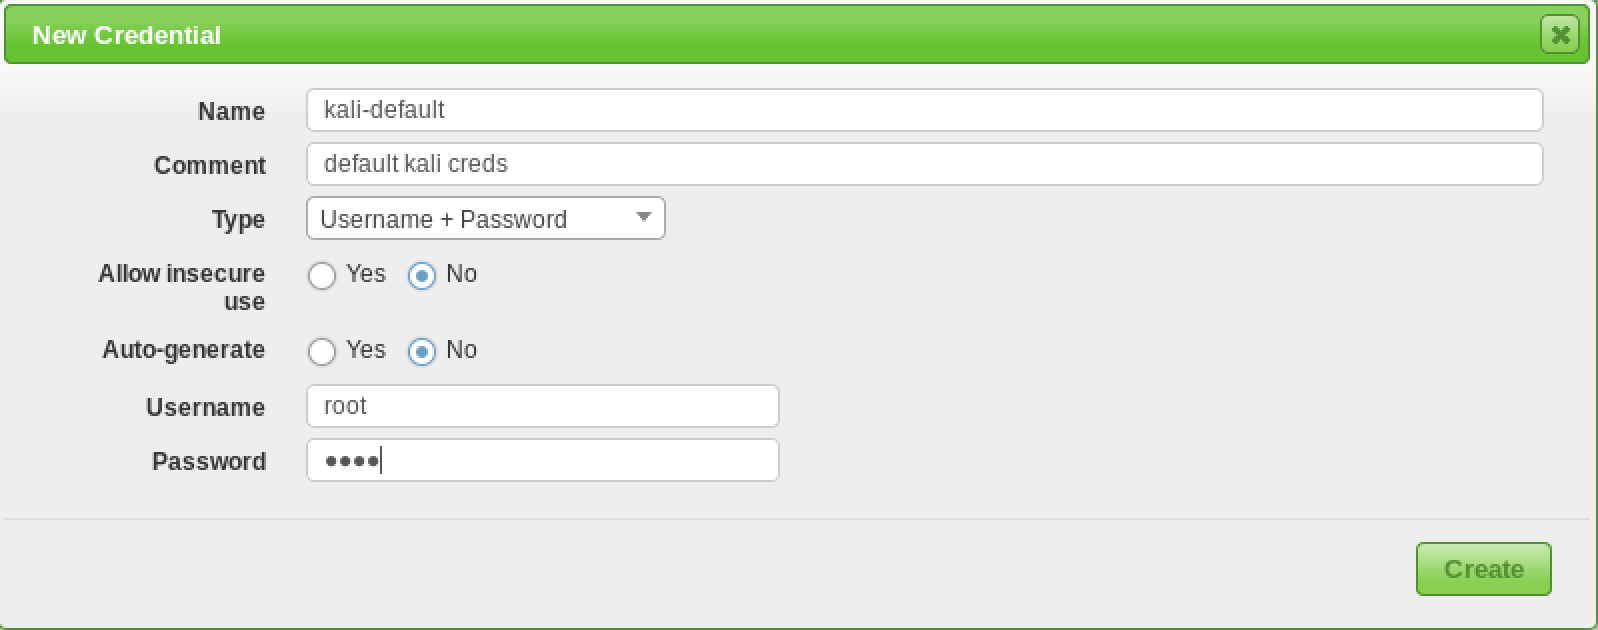
Vulnerability scanners provide the most complete results when you are able to provide the scanning engine with credentials to use on scanned systems. OpenVAS will use these credentials to log in to the scanned system and perform detailed enumeration of installed software, patches, etc. You can add credentials via the “Credentials” entry under the “Configuration” menu.
Target Configuration
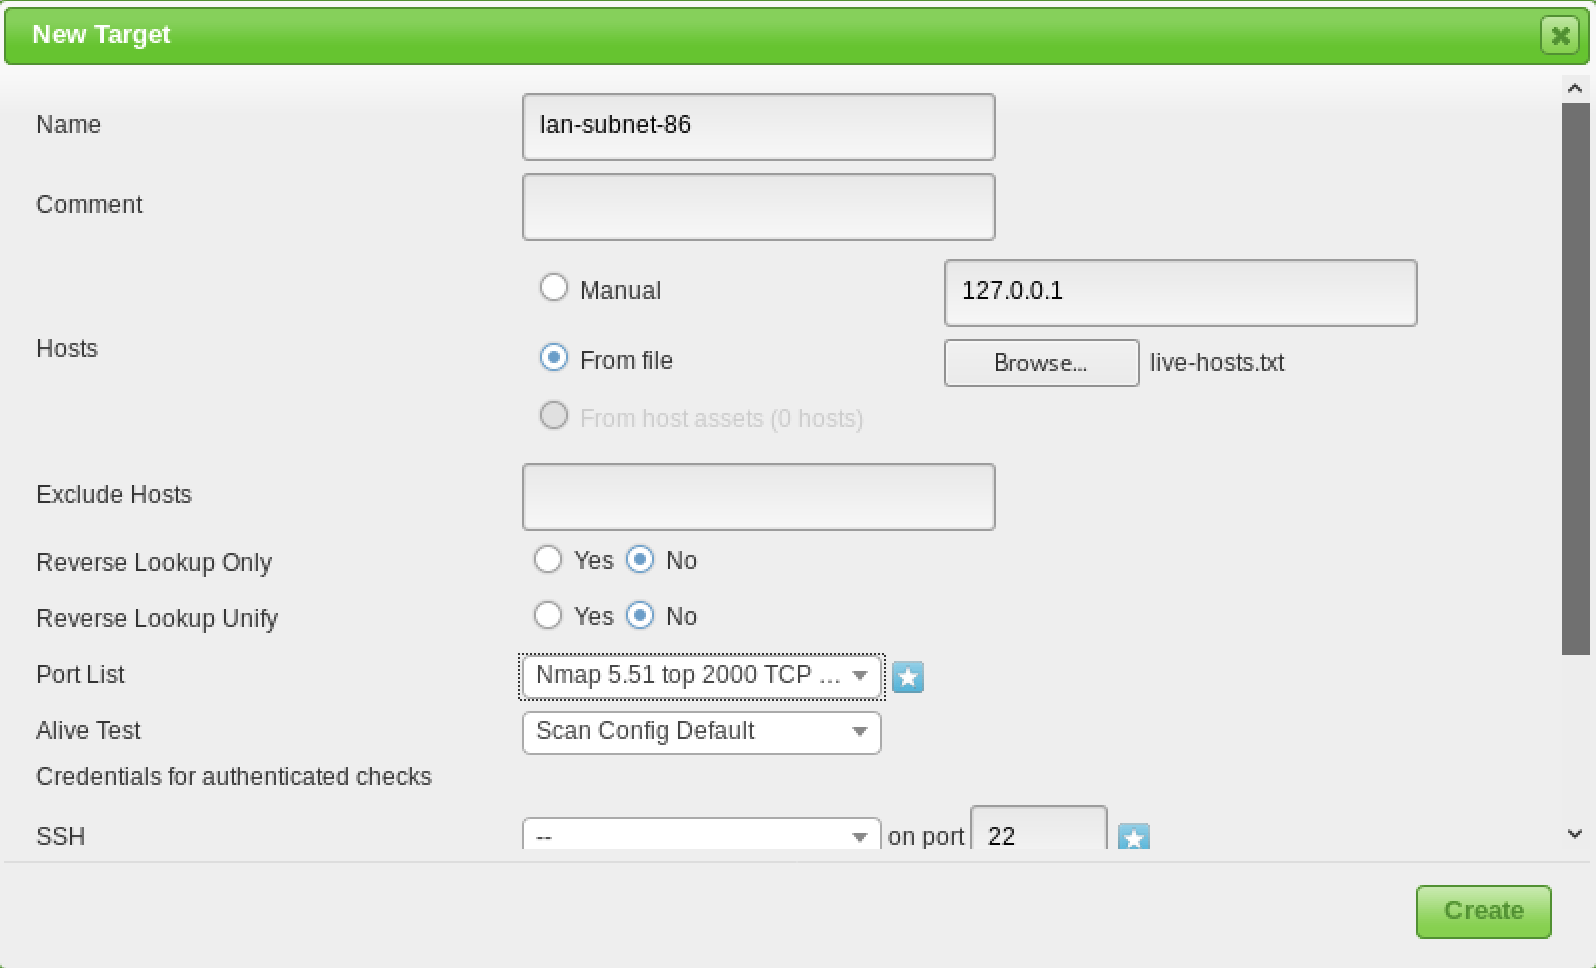
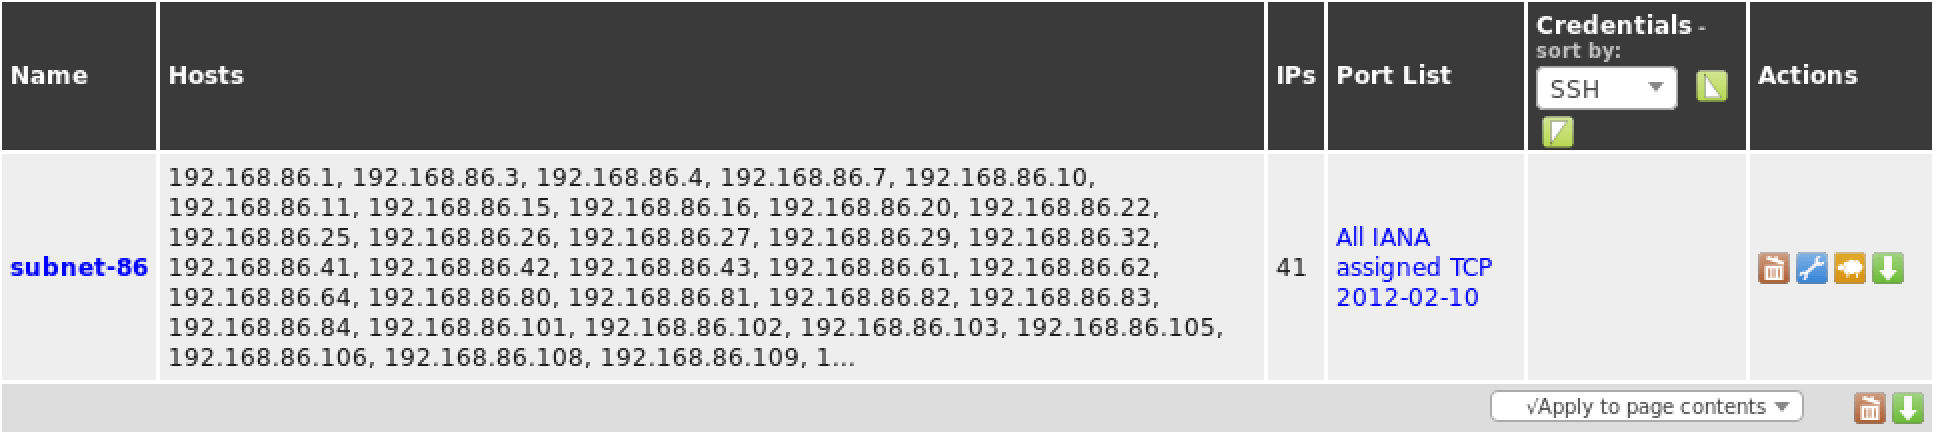
OpenVAS, like most vulnerability scanners, can scan for remote systems but it’s a vulnerability scanner, not a port scanner. Rather than relying on a vulnerability scanner for identifying hosts, you will make your life much easier by using a dedicated network scanner like Nmap or Masscan and import the list of targets in OpenVAS:
root@kali:~# nmap -sn -oA nmap-subnet-86 192.168.86.0/24
root@kali:~# grep Up nmap-subnet-86.gnmap | cut -d " " -f 2 > live-hosts.txt
Once you have your list of hosts, you can import them under the “Targets” section of the “Configuration” menu.
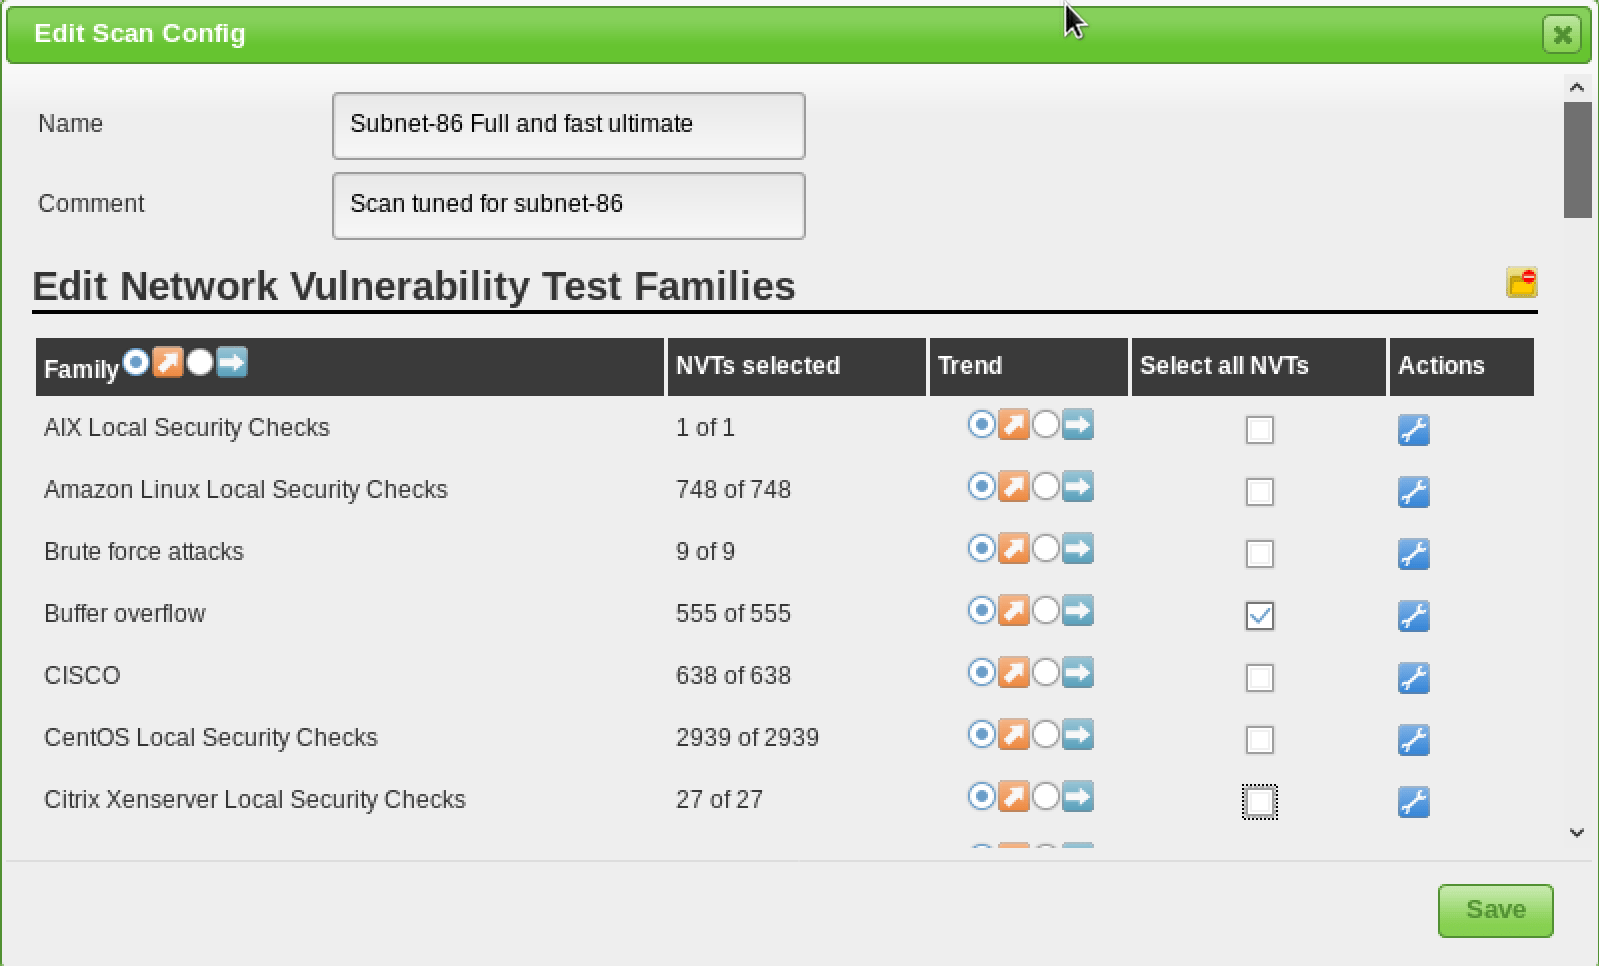
Scan Configuration
Prior to launching a vulnerability scan, you should fine-tune the Scan Config that will be used, which can be done under the “Scan Configs” section of the “Configuration” menu. You can clone any of the default Scan Configs and edit its options, disabling any services or checks that you don’t require. If you use Nmap to conduct some prior analysis of your target(s), you can save hours of vulnerability scanning time.
Task Configuration
Your credentials, targets, and scan configurations are setup so now you’re ready to put everything together and run a vulnerability scan. In OpenVAS, vulnerability scans are conducted as “Tasks”. When you set up a new task, you can further optimize the scan by either increasing or decreasing the concurrent activities that take place. With our system with 3GB of RAM, we adjusted our task settings as shown below.

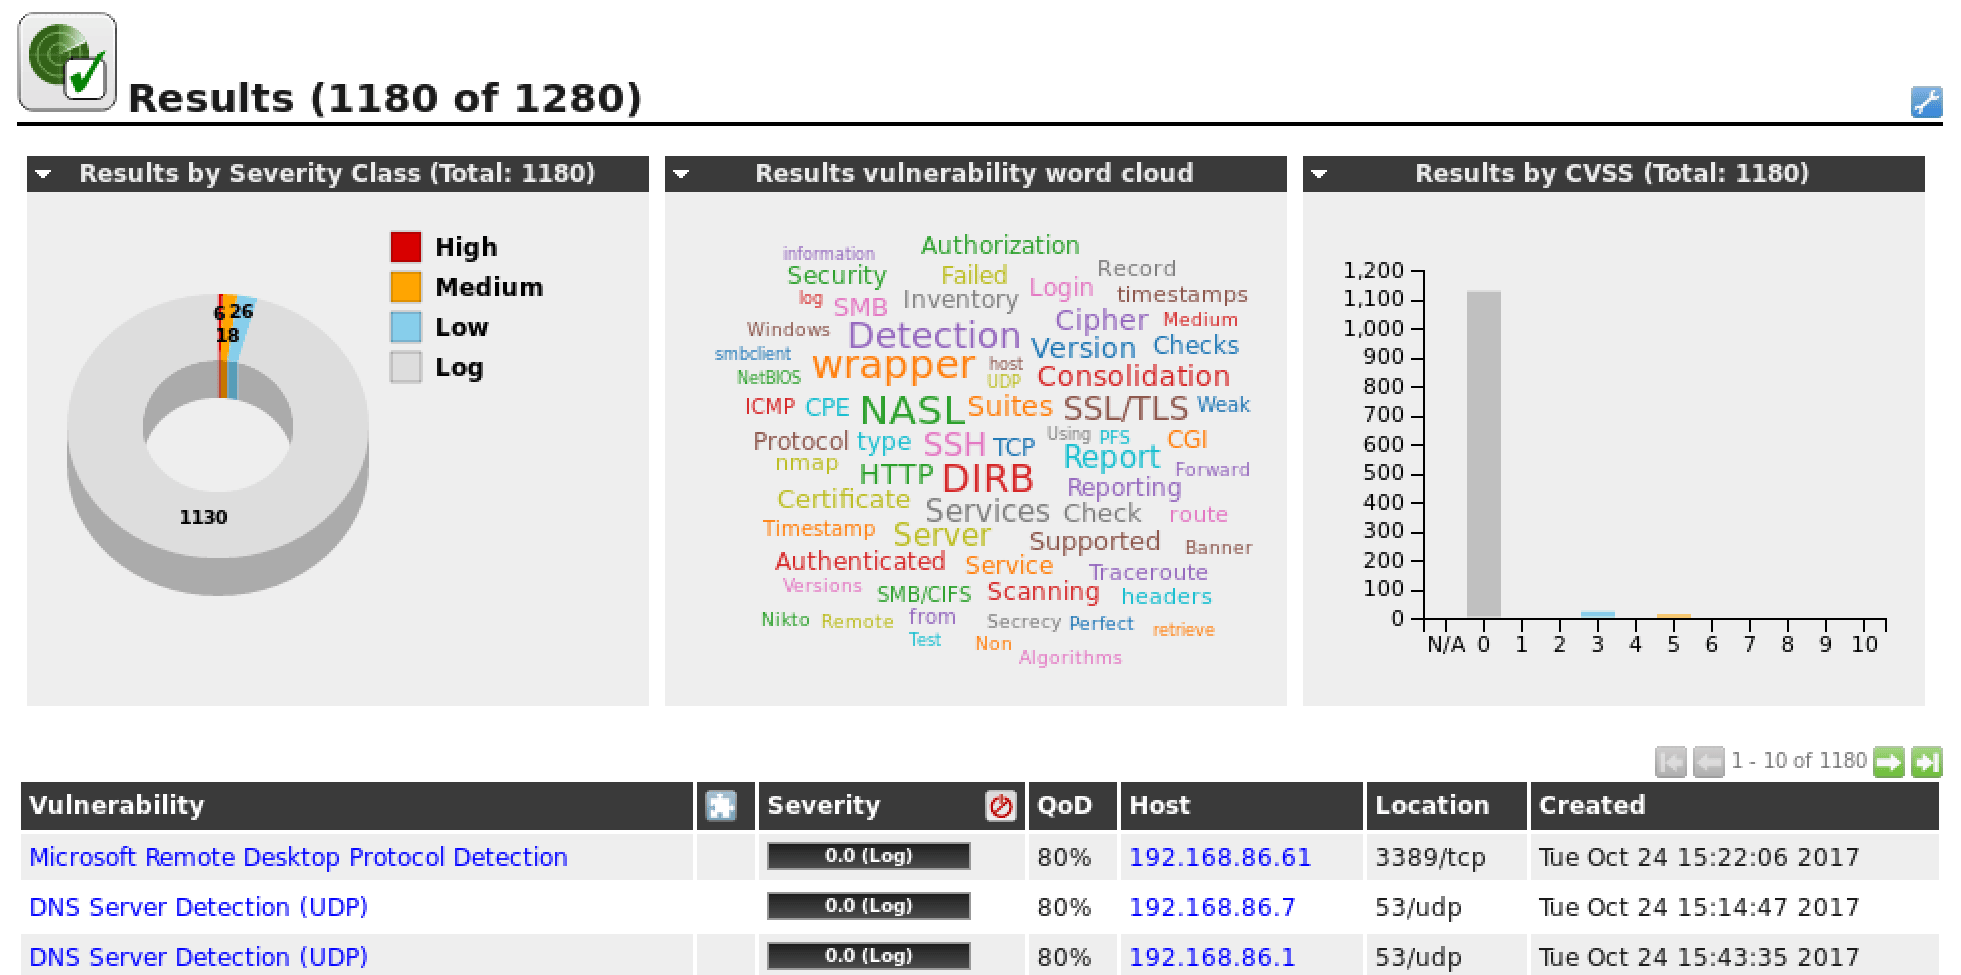
With our more finely-tuned scan settings and target selection, the results of our scan are much more useful.
Automating OpenVAS
One of the lesser-known features of OpenVAS is its command-line interface, which you interact with via the ‘omp’ command. Its usage isn’t entirely intuitive but we aren’t the only fans of OpenVAS and we came across a couple of basic scripts that you can use and extend to automate your OpenVAS scans.
The first is openvas-automate.sh by mgeeky, a semi-interactive Bash script that prompts you for a scan type and takes care of the rest. The scan configs are hard-coded in the script so if you want to use your customized configs, they can be added under the “targets” section:
root@kali:~# apt -y install pcregrep
root@kali:~# ./openvas-automate.sh 192.168.86.61

:: OpenVAS automation script.
mgeeky, 0.1

[>] Please select scan type:
1. Discovery
2. Full and fast
3. Full and fast ultimate
4. Full and very deep
5. Full and very deep ultimate
6. Host Discovery
7. System Discovery
9. Exit

--------------------------------
Please select an option: 5

[+] Tasked: 'Full and very deep ultimate' scan against '192.168.86.61'
[>] Reusing target...
[+] Target's id: 6ccbb036-4afa-46d8-b0c0-acbd262532e5
[>] Creating a task...
[+] Task created successfully, id: '8e77181c-07ac-4d2c-ad30-9ae7a281d0f8'
[>] Starting the task...
[+] Task started. Report id: 6bf0ec08-9c60-4eb5-a0ad-33577a646c9b
[.] Awaiting for it to finish. This will take a long while...

8e77181c-07ac-4d2c-ad30-9ae7a281d0f8 Running 1% 192.168.86.61
We also came across a blog post by code16 that introduces and explains their Python script for interacting with OpenVAS. Like the Bash script above, you will need to make some slight edits to the script if you want to customize the scan type:
root@kali:~# ./code16.py 192.168.86.27
------------------------------------------------------------------------------
code16
------------------------------------------------------------------------------
small wrapper for OpenVAS 6

[+] Found target ID: 19f3bf20-441c-49b9-823d-11ef3b3d18c2
[+] Preparing options for the scan...
[+] Task ID = 28c527f8-b01c-4217-b878-0b536c6e6416
[+] Running scan for 192.168.86.27
[+] Scan started... To get current status, see below:

zZzzZzzZzzZzzZzzZzzZzzZzzZzzZzzZzzZzzZzzZzzZzzZzzZzzZzzZzzZzzZzzZzzZzzZzzZzz
...
zZzzZzzZzzZzzZzzZzzZzzZzzZzzZzzZzzZzzZzzZzzZzzZzzZzzZzzZzzZzzZzzZzzZzzZzzZzz

[+] Scan looks to be done. Good.
[+] Target scanned. Finished taskID : 28c527f8-b01c-4217-b878-0b536c6e6416
[+] Cool! We can generate some reports now ... :)
[+] Looking for report ID...
[+] Found report ID : 5ddcb4ed-4f96-4cee-b7f3-b7dad6e16cc6
[+] For taskID : 28c527f8-b01c-4217-b878-0b536c6e6416

[+] Preparing report in PDF for 192.168.86.27

[+] Report should be done in : Report_for_192.168.86.27.pdf
[+] Thanks. Cheers!
With the wide range of options available in OpenVAS, we were only really able to just scratch the surface in this post but if you take your time and effectively tune your vulnerability scans, you will find that the bad reputation of OpenVAS and other vulnerability scanners is undeserved. The number of connected devices in our homes and workplaces is increasing all the time and managing them becomes more of a challenge. Making effective use of a vulnerability scanner can make that management at least a little bit easier.