My Custom Kali Linux Distribution
We love it when community members come up with new ideas or interesting builds, and this one caught our attention. Jacek Kowalczyk hit us up on Twitter with a really interesting story. His approach to tweaking Kali to be specific to his needs is exactly why this feature is so important to us and we wanted to share his story more widely.
Jacek’s live-build recipe was for a lightweight version of Kali using his favourite desktop environments, including some nice desktop configurations. We thought it would be best to let Jacek share his process with you step by step, in his own words:
Jacek’s Story
I spent a lot of time on searching for a Linux distribution that was best suited for my needs. I wanted a very lightweight system and went about testing a ton of variants (Manjaro, Debian, Ubuntu, Sparky, MX Linux, Antix, Arch, Anarchy, Antergos, Archlabs, Bunsen Labs, and many more). I also tested different desktop environments trying to find my right fit (Xfce, LXDE, Mate, LXqt, i3, openbox, fluxbox, jwm, and IceWM). Despite this exhaustive testing, I still wasn’t satisfied.
It started to become clear that for my needs, I needed a rolling release Linux that was not only lightweight, but also had good support from either a company or community. I made a long list of my favourite Linux distributions, but I still couldn’t decide.
I had always wanted to take part in an Open-source project and do a little development. It occurred to me that my solution could be to simply create my own setup–I could take a Linux distro, install a base OS, and customize it. At first, this seemed like a great option. But what would happen if I needed to reinstall? I didn’t want to have to start over again on customizing my installed system.
I knew I wanted to create an ISO that I could use to install my system anytime, anywhere. It would be perfectly customized for my needs fresh out of install. Because of this, I started to look for ways of customizing Debian, Arch, or Manjaro. This led me to the Kali Linux live-build config scripts. At this point, I knew I had found my solution.
Kali Linux is a rolling distro based on Debian and has great support from the OffSec team as well as an active community. I also found existing scripts for i3wm provided by the Kali team. This was my starting point. I started playing with the custom packages list and later on with some chroot files to be included in the ISO. In this process, I generated over 20 ISO images until I had one I was happy with. Even now, I am still continuing to improve on it.
Let me explain how I created two variants of Kali Linux–one with i3wm and one with Openbox window manager.
Custom Kali Linux with i3wm or Openbox
I did my first setup based on the official Kali documentation for live-build-config. This process was:
- Install Kali Linux. Use any official Kali image.
- Install additional packages.
- Start hacking i3wm/Openbox variants. I treated these as two separate builds initially, to keep things cleaner for myself. I was doing double the work, but it was easier to track:
root@kali:~# apt install curl git live-build cdebootstrap
root@kali:~# git clone git://gitlab.com/kalilinux/build-scripts/live-build-config.git
...
root@kali:~# cd live-build-config/kali-config
root@kali:~/live-build-config/kali-config# ls
common variant-e17 variant-i3wm variant-light variant-mate
variant-default variant-gnome variant-kde variant-lxde variant-xfce
For i3, I started with making my modifications in the existing variant-i3wm folder. For Openbox, I copied the variant-i3wm directory to variant-openbox and added my modifications to it:
root@kali:~/live-build-config/kali-config# cp -r variant-i3wm variant-openbox
With that in place, the next step was to edit the file kali-config//package-lists/kali.list.chroot to add the required packages I wanted. My list of packages for i3wm can be found here, and Openbox here. All config files for the livecd should be copied to kali-config/common/includes.chroot/root/. This directory is used as the livecd environment is running as the root user.
All config files for the installed file system should be copied to kali-config/common/includes.chroot/etc/skel/. The /etc/skel directory is commonly used as a template for creating user home directories, so every new user will by default have the files that are located in this directory.
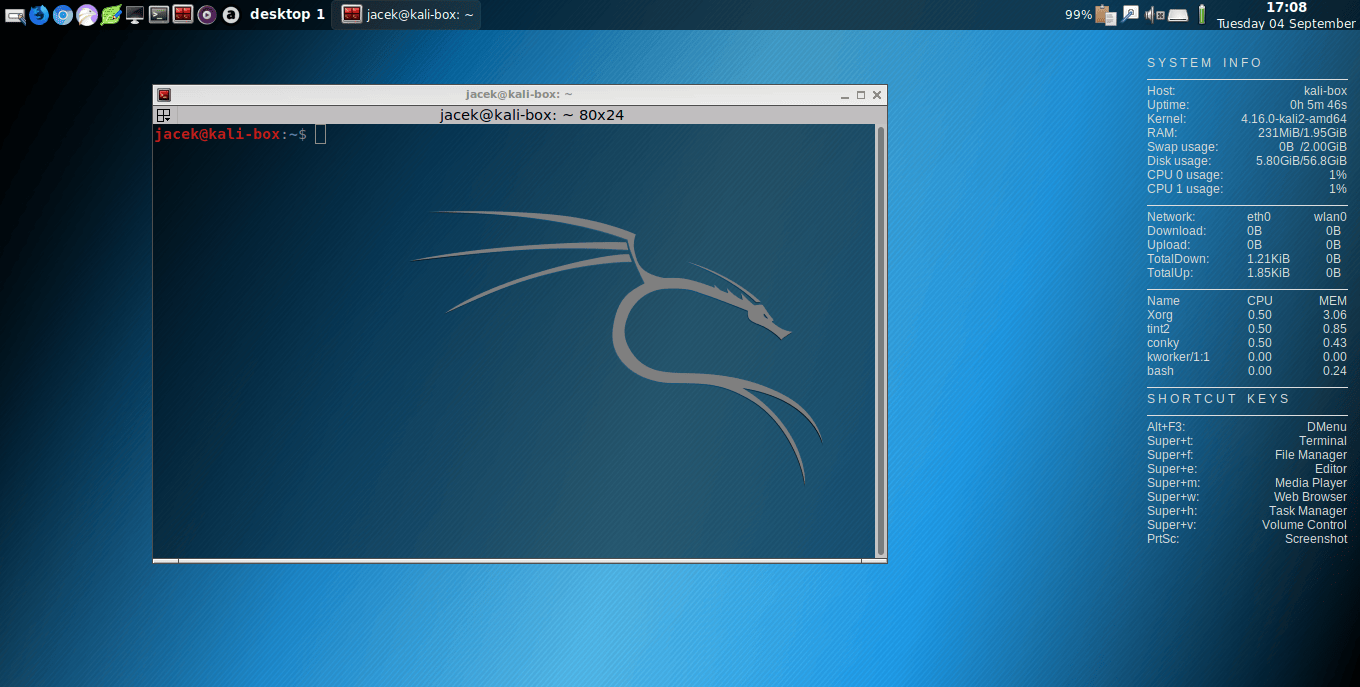
Nitrogen is an application used to setup wallpaper. The file .config/nitrogen/bg-saved.cfg defines the set wallpaper. The second file .config/nitrogen/nitrogen.cfg is the main configuration file for nitrogen and defines the directories where the wallpaper images are located. I tweaked each of these out to fit my preferences. With that in place, I then also tweaked the power manager applet by configuring .config/xfce4/xfconf/xfce-perchannel-xml/xfce4-power-manager.xml.
Additionally, I made a range of other customizations to personalize the system a bit more. Without going into too much detail, they were:
For i3wm
kali-config/common/includes.chroot/root/.i3wm_conkyrc - Configuration for conky tool. This conkyrc file is based on the conky configuration from Sparky Linux
kali-config/common/includes.chroot/root/.config/i3/config - The configuration file for i3wm was generated for me on the fist login to i3wm session, and I added a few changes to autostart other tools like: nitrogen, clipit, volume control, and defined my key bindings for my tools and actions (poweroff and reboot).
For Openbox
kali-config/common/includes.chroot/root/.openbox_conkyrc - configuration for conky. The openbox conkyrc is a different from the one for i3wm. This one is based on the conkyrc file from CrunchBang++.
kali-config/common/includes.chroot/root/.config/openbox/autostart - Openbox autostart file defines which tools and applications should be started automatically with openbox session: (nitrogen, clipit, volume vontrol, power manager, conky). I based it on the file from CrunchBang++ also.
kali-config/common/includes.chroot/root/.config/openbox/menu.xml - This is the Openbox menu config, controlling what happens when you right-click on the desktop. Openbox is really unique in that this file is completely user controlled and you can run scripts in it and do other things like starting applications or even to view the status the media player application in dynamic pipe menu. Openbox is really powerful.
kali-config/common/includes.chroot/root/.config/openbox/rc.xml - Openbox window manager themes and keybindings. This is pretty stock, but I added there my keybindings for my favourite tools and actions like poweroff and reboot.
kali-config/common/includes.chroot/root/.config/tint2/tint2rc - Tint2 panel settings and launchers. Here, I added my most commonly used tools: terminal, editors, web browsers. To edit this file I used tint2conf gui application. This application allows to easily define the themes of the tint2 panel and add launchers and other items of the panel.
All the changes for i3wm can be found here and Openbox can be found here.
I also added the Firefox developer edition browser by downloading the install package and unpacking it into kali-config/common/includes.chroot/opt/firefox/ and then added the toxic tox client to kali-config/common/includes.chroot/opt/toxic. To start up Firefox, I added also the shell script kali-config/common/includes.chroot/usr/bin/firefox.sh:
#!/bin/bash
echo "Starting firefox developer edition"
/opt/firefox/firefox
- Build the ISOs
With all that configuration out of the way, it was time for the fun part, building the ISOs!
root@kali:~/live-build-config/kali-config# ./build.sh --distribution kali-rolling --variant i3wm --verbose
root@kali:~/live-build-config/kali-config# ./build.sh --distribution kali-rolling --variant openbox --verbose
With those running, I then just had to wait for the job to finish. In my case it took about 3 hours. The ISO files it generated were saved in the images subfolder.
Final Version
In the final version of the configs, I decided to port my i3wm install to my Openbox build. This way, when building the Openbox config, I am getting both window managers, Openbox and i3. On the login screen, I can select the session I want. Obviously, its much easier to have one “perfect” ISO than have to decide between the two at install time.
Wrapping up
We loved Jacek’s approach of identifying his needs, and then not being afraid of just jumping in and making the changes. Like many things on Linux, doing a custom install can be intimidating and look like a very complex process. But once you get in and start the process, it’s really pretty straightforward and the amount of work it can save you is amazing.
Thanks to Jacek for all his hard work, and being willing to share it with the community. You can see what else Jacek is up to at his page at his GitLab page.